How to Create a Google Gemini API Token Step by Step
Google’s Gemini (formerly Bard) models are now available to developers through the Google AI Studio and Google Generative AI API. If you’re looking to integrate Gemini into your application—whether for text generation, chat, or multimodal tasks—you’ll need an API token. This guide walks you through how to get your Gemini API key, step by step.
✅ Prerequisites
Before you begin, make sure you have:
- A Google Account (Gmail or Workspace)
- Access to Google AI Studio: https://aistudio.google.com
- Billing enabled for Google Cloud (if using the API outside of AI Studio)
🔐 Step-by-Step: How to Create a Google Gemini API Token
Step 1: Go to Google AI Studio
Navigate to https://aistudio.google.com and sign in with your Google account.
💡 Tip: AI Studio is the easiest way to start experimenting with Gemini models without setting up cloud projects manually.
Step 2: Accept the Terms of Service
The first time you access Google AI Studio, you’ll be prompted to accept terms and conditions. Accept to proceed.
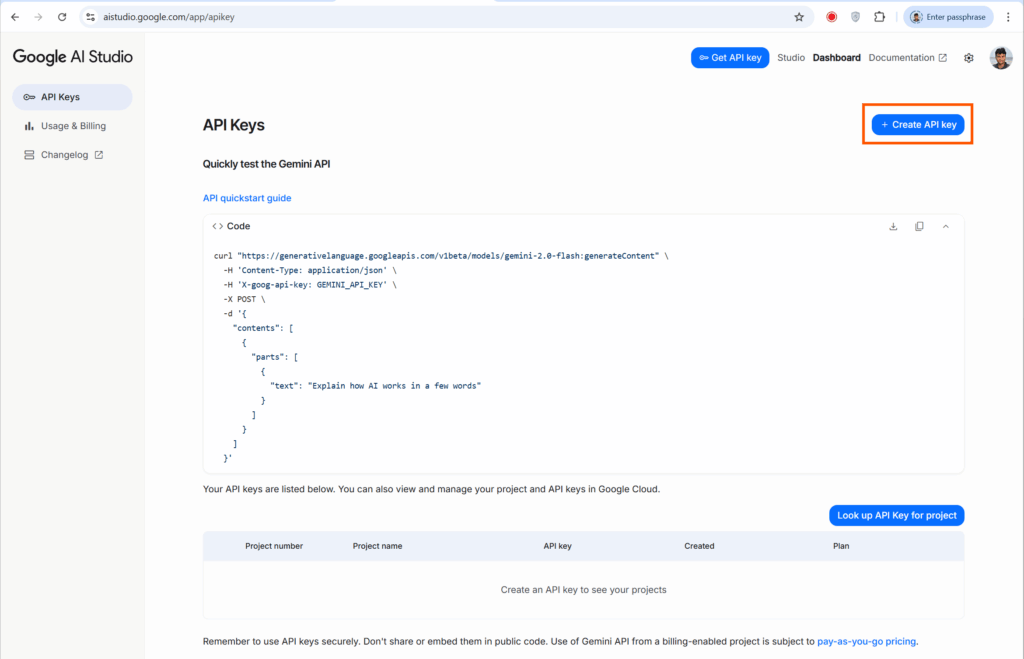
Step 3: Click on “Create API Key”
- In the top-right corner of the AI Studio dashboard, click on your account avatar.
- Choose “Create API Key” from the dropdown menu.
If you don’t see this option, you may not yet have access. Make sure you’re signed into the correct account and try again later.
Step 4: Copy Your API Key
Once generated, your API key will appear in a popup. Copy it and store it securely.
🔒 Keep your API key private. Anyone with your key can use your API quota, potentially incurring charges.
Step 5: Use Your API Key in Code
To start using the Gemini API, include your API key in your request headers. Here’s a simple example using Python and google-genai package:
Install the google-genai package
pip install -q -U google-genaiSet the generated API token as an environment variable.
# Replace <YOUR_API_KEY_HERE> with the actual API key
export GEMINI_API_KEY=<YOUR_API_KEY_HERE>
Make your 1st request using the generated token
from google import genai
from google.genai import types

client = genai.Client()

response = client.models.generate_content(
    model="gemini-2.5-flash",
    contents="What is the capital of India?",
    config=types.GenerateContentConfig(
        thinking_config=types.ThinkingConfig(thinking_budget=0) # Disables thinking
    ),
)
print(response.text)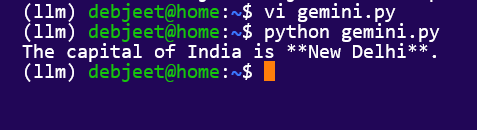
📚 Full API documentation:
https://developers.generativeai.google
🔄 Optional: Use Google Cloud Console (Advanced)
If you prefer or need to manage keys through Google Cloud, here’s how:
- Go to https://console.cloud.google.com
- Create a project or select an existing one.
- Enable the Generative Language API.
- Go to APIs & Services > Credentials
- Click “Create Credentials” > “API Key”
This approach gives you more control over API usage, billing, and access restrictions.
🧮 Pricing and Quotas
As of now, Gemini APIs offer both free and paid tiers, depending on usage and model version (e.g., gemini-pro, gemini-1.5-pro, etc.). Be sure to check your quota and pricing here:
https://ai.google.dev/gemini-api/docs/pricing
🛠️ Troubleshooting Tips
- API key not working? Check if the Gemini API is enabled on your project (if using Google Cloud).
- Quota errors? You may have hit usage limits. Check the Quotas tab.
- Permission issues? Make sure the API key is linked to the correct project and has necessary access.
🎯 Final Thoughts
Creating a Google Gemini API token is quick and easy through Google AI Studio, making it simple for developers to get started with powerful generative AI tools. Whether you’re building chatbots, summarization tools, or creative applications, Gemini provides state-of-the-art capabilities with just a few lines of code.
📌 Helpful Links
- Google AI Studio: https://aistudio.google.com
- Generative AI API Docs: https://developers.generativeai.google
- Google Cloud Console: https://console.cloud.google.com